Consider a Drip System
Drip irrigation can make successful gardeners out of the most negligent bachelors who can’t keep anything alive for more than a week.
Drip irrigation enables serious gardeners to scale up their crops, conserve water and keep their crops thriving while they travel.
Want to Grow Your Own Veggies but Lack Time?
Want to enjoy fresh vegetables from your own garden? Want to enjoy the freshest and tastiest garden vegetables – carrots, tomatoes, potatoes, beets, lettuce and more, that supermarkets seem unable to deliver? Does the prospect of spending hours in the garden stop you from growing your own veggies? Do you want to grow fresh herbs and vegetables even though you’re strapped for time and can’t stay home to water, feed, prune and weed your crops? The good news is drip irrigation makes it easy to keep your crops thriving while you’re gone.
Benefits of a Drip Irrigation System
You can set up a drip system to water your crops according to a continuous, infinitely repeating schedule. You can also cover the drippers with mulch and install a device that adds fertilizer to the water. That way, the drip system takes care of watering, weeding and feeding.
The primary benefit is that you can free yourself from worrying about whether your plants are being watered consistently and optimally.
You can add fertilizer or plant food to the water stream so that you can forget about both watering and fertilizing. To do this, you install a special cartridge that adds a metered dose of liquid fertilizer to the drip irrigation water.
You can cover your garden soil and drip emitters with mulch. The mulch cover will discourage weeds and save water otherwise lost to evaporation.
By automating all of these tasks, a drip system can bring gardening into the realm of possibilities for the busiest of urban professionals.
Moreover, a drip irrigation system is easily expandable. Simply replicate the timers, lines, connectors and drippers.
Your drip system will give you the flexibility to start small and scale up as you gain confidence and competence in your ability to grow your own veggies.
Still skeptical? Relax because you’ll find a huge library of resources online to walk you through the whole process of setting up a drip system, step by step.
Imagine how you’ll enjoy growing vegetables and herbs without having to pick up a watering can, a fertilizer spreader or a weeding fork. Simply prune your tomato vines and harvest your veggies, snip off sprigs of herbs, and let your drip system take care of the rest.
With drip irrigation you’ll get the most efficient water utilization, by far. You can eliminate evaporation by covering the soil and the drippers with mulch. With drippers, you won’t lose water to spillage or overflow. The drip system will supply each plant with exactly the right amount of water.
You can pretty much buy any accessory that you can imagine for your drip system to make it easier to grow any crop you want.
I wondered about row crops of beets and carrots. It turns out you can buy drip tubing or drip tape to water an entire row. Like drip emitters, they’ll deliver water at a set rate, not to a single plant, but to an entire row of carrots, beets, or any other row crop.
Consider how you would benefit from a drip irrigation system for your balcony, for your indoor plants , or for potted plants on the backyard deck, where you can start growing your own veggies.
Imagine your freedom from routine watering, weeding, and feeding that drip irrigation will do for you. Consider all of the gardening possibilities that open up for you when you set up a drip system that requires a one-time investment of about a hundred dollars.
Here’s what you need to set up drip irrigation for vegetables and herbs.
For $100, you can buy everything you need. A drip irrigation kit includes the following parts:
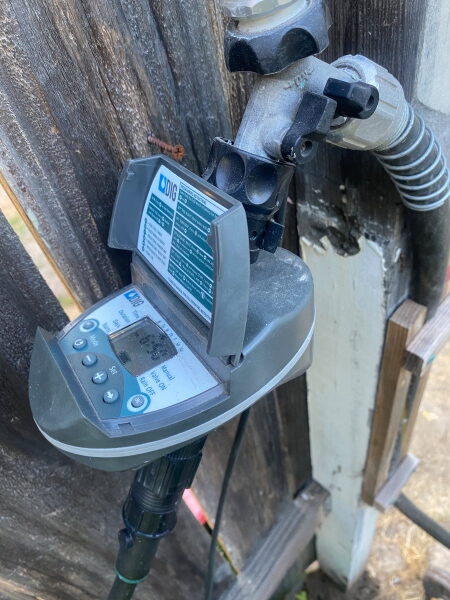
1) Automatic Irrigation Valve or Timer Valve
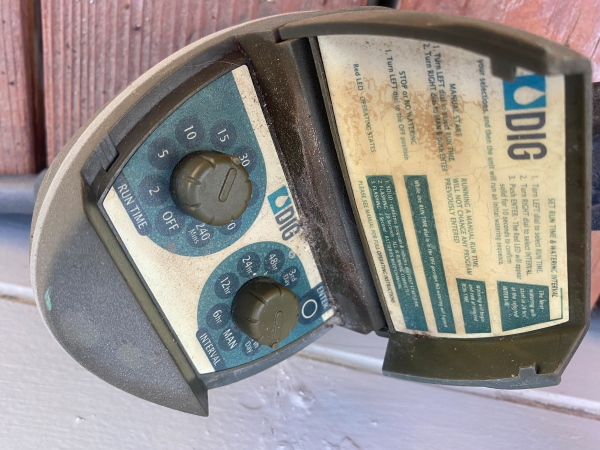
This is the most expensive piece of kit for setting up your drip system. It’s a timer valve that fits onto a garden faucet or onto the end of a garden hose. It’s also called a watering timer.
Just as you would set up a coffee maker, you set up the timer valve to turn on the water to your drip system at specific times and durations. You can select the days of the week, the time of the day, and the duration for multiple watering sessions. For example, on specific days of the week, say M, W and F, you can set up the valve to open for 15 minutes. You can schedule this for early in the morning and then again at midday, or in the mid-afternoon, or according to any schedule that suits your crop, delivering exactly the right amount of water to where it matters most. Again, setting up the timer valve is similar to setting up your coffee maker, or multiple alarms on your phone.
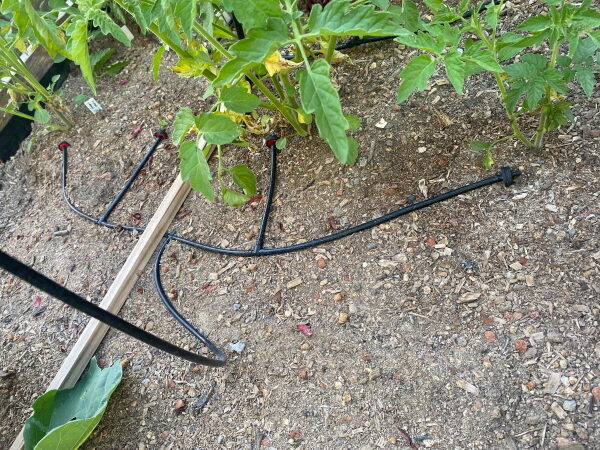
2) Tubing and Tee Connectors
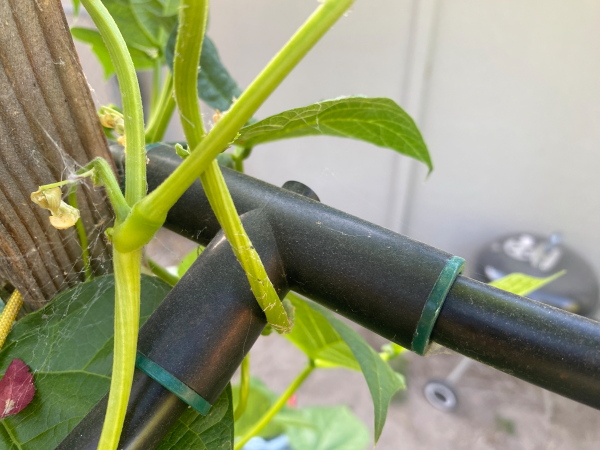
You pipe water from the timer valve to each plant in your crop through a distribution network of black plastic PVC tubing. In general, you’ll use ¾ inch diameter tubing for the main line from the timer valve to your garden. Then you’ll tap into the main line to supply water to ¼ inch diameter tubing to distribute water to individual plants or rows of plants. You’ll use tee connectors to add branches to the ¼ inch line, with shorter lengths of tubing running to each stem or row of plants. For an individual plant, you’ll stop off the end of the tubing with a drip emitter. For rows of veggies like carrots, you’ll terminate the tubing with drip tape.
What is PVC tubing? Also known as vinyl tubing, PVC tubing is that black tubing you often see on sidewalk garden plots for watering sidewalk trees and plants. It’s dirt cheap. Again, you’ll need half-inch to three-quarter inch diameter tubing for your main line. You’ll use a garden hose adapter to attach this large diameter tubing directly to the timer valve. You’ll run the main line from the timer valve out to your garden, with enough length and branch lines to reach every plot, raised beds or pot. Then you’ll need quarter inch tubing to connect the main line to individual drip emitters at each plant in a given plot, raised bed or pot.
For example, you can run a main line of large diameter tubing alongside a series of raised beds, pots and garden plots. Then you can tap into the main line with a special fitting that punctures the main line to supply water to a specific raised bed through smaller diameter tubing.
The idea is to arrange your drip network so that the large tubing covers most of the distance from the timer valve to your veggies. Then tap into the main line with small tubing to distribute water over short distances to a few plants.
For a single raised bed, I will tap into my main line at up to seven points to supply water to my veggies through quarter inch tubing. Using tee connectors, each of the tap lines branches into several shorter lines, with each of those capped off with a drip emitter.
It may suit you to run two, three or more main lines across your garden.
3) Other Connectors
We’ve already covered tee connectors to branch out a single tap line to reach several plants. We’ve also covered the puncture connectors for tapping directly into the main line. I use these two connectors the most.
There are a variety of elbows, unions and tees for the main line as well as for the tap lines, allowing you to configure your drip system without constraint.
Also available are pipe thread fittings and garden hose adaptors to connect your timer valve inline to a back flow stopper and to a single main line or multiple main lines for your drip system.
Yet another useful adaptor is a hose thread fitting that splits the water supply from your garden facet into two outlets, each with its own shut off valve. With this adaptor you can attach your timer valve and garden hose to the same faucet.
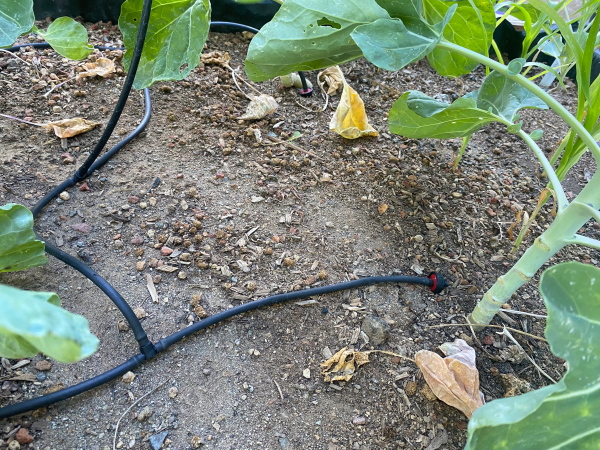
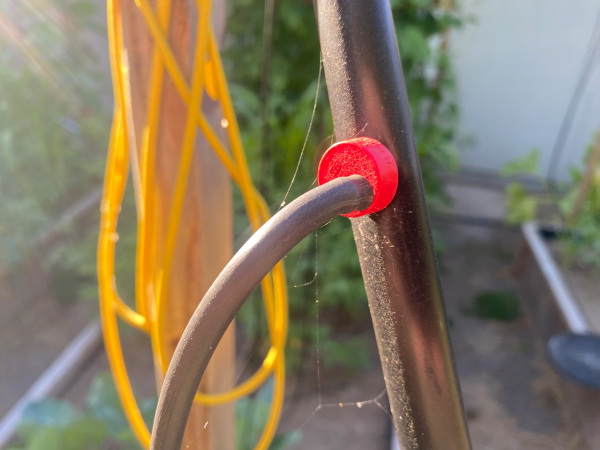
4) Drip Emitters

Again. You’ll cap off the ends of the ¼ inch tubing with a drip emitter, right where the quarter inch tubing ends at the stems of your veggie plants. Simply push the barbed inlet tube of the drip emitter, or dripper, into the end of the PVC tube. Then when the timer valve opens, water will drip out of the emitter at a controlled rate.
You can purchase individual drippers or bags of a hundred. They cost around 30 cents each. You can select from a variety of fixed flow rates. I find that I use 0.5 gallon per hour drippers the most. Drippers are also available up to 2 gallons per hour or more. Adjustable drippers are also available. Usually, I’ll deliver less than half a gallon of water to each of my tomato, brussel sprouts, cauliflower and zucchini plants per day, meaning that I’ll set up the timer valve to open for less than an hour in the early morning.
You’ll typically place an emitter right next to the stem of your plant. That allows you to cover all the soil with a surface of mulch or landscaping fabric to prevent excess evaporation of water and the proliferation of weed.
5) Drip Tape
In addition to drippers that deliver drops of water in one place, say, a single tomato plant, you can also install drip tubing or drip tape to water an entire row of veggies, say carrots, or beets.
6) Tools and Skills You Need to Set Up a Drip System
The tools and the skills you need are basic and rudimentary. If you can attach a garden hose to a sprinkler, then you pretty much have all the skills you need. The tools you need are basic and widely available. You’ll need a pair of scissors or a utility knife to cut the PVC tubing. I prefer a utility knife. The connectors are either press-fit or twist connectors, needing no tools at all. Punch-through connectors allow you to tap a quarter inch tube directly through the side of a larger main line. They require brute force, but you can buy a simple puncturing tool to make it easier to push the connector through the side of the PVC main line.
It helps to have a pair of slip lock pliers to tighten garden hose fittings. It’s good to have a roll of Teflon tape for wrapping their threads. Then you can make sure that once you’ve connected the hose fittings, you can easily disconnect them. You’ll need pipe thread compound or pipe thread tape for making pipe thread connections, for example, between a back flow stopper (one way valve) and the timer valve. The back flow stopper prevents fertilized water from getting sucked into your home water supply.
Pushing the barb connections on the emitters and tee connections into the PVC tubing is a pain at first, but gets easier with practice. It helps to warm the PVC tubing in hot water in sunlight to ease insertion.
The biggest mistake I’ve made was installing the emitters backwards. They won’t drip. They must have some kind of one way check valve built into them. So I simply pulled them out and reinstalled them the right way around.
7) Your Watering Schedule
Here are a few points to consider when setting up your watering schedule on your timer valve. You can schedule the watering on alternate days, or twice a week, et cetera, to allow the soil to dry out between watering sessions. That can help prevent root rot. Then you can set the duration of the watering session, to water the soil until it’s moist but not saturated. You have to gauge that by observation.
8) After You Set Up the Drip Irrigation System, It’s Pretty Much Set It and Forget It
With your drip irrigation system in place, you can pretty much set it and forget it. Of course, you’ll want to check for faulty emitters, leaks and whether you’re delivering the optimal amount of water. But after that you can leave on vacation and rest assured that the automated timer valve, vinyl tubing and drip emitters will keep your plants perfectly watered, as required.