TOMATO CHECKLIST ITEM 3 - POTTING ON.
Previously we looked at setting up a nursery to germinate your tomato seeds. Two or three weeks afterwards, you’ll need to transplant the seedlings from their nursery cups into half pint (250 mL) pots before the seedlings’ root system becomes too dense, and before the roots start to grow into the paper fiber egg cups. This is called Potting On.
When potting on, use half pint (250 mL) plastic pots or commercially available pots pressed from manure. Or save yogurt cups, etc. Plastic pots can be reused but require a little skill to remove the seedlings later on when you transplant them. By contrast, you can simply moisten the manure pots and crumble them away from the growing root ball. The manure pot manufacturers also claim that you can simply leave the manure pots intact when you transplant them into your garden, i.e. allow them to break down into the soil. I feel that this would impede root growth too much, so I crumble the manure pots open at the very least. But we’re getting ahead of ourselves. Transplanting comes later, after potting on and hardening off.
Back to potting on:
Use commercial potting soil or prepare your own mixture of horse manure, peat moss and sand augmented with organic fertilizer and some crushed oyster shells to provide calcium. Moisten and work out the lumps then coarsely sift or screen the soil with hardware cloth (1/4 inch square wire mesh) or chicken wire. It helps to use a screening frame. Make one by stapling a square section of hardware cloth or chicken wire to a rough wooden frame.
Fill each pot with moistened, sifted/screened potting soil. Stick your finger in to make a shallow well for the seedling. Carefully transfer the seedling and its nursery soil from its nursery cup into the well. Gently compress the soil in the pot around the seedling.
Again, make sure you pot on the nursery seedlings before they get root bound in their nursery cups.
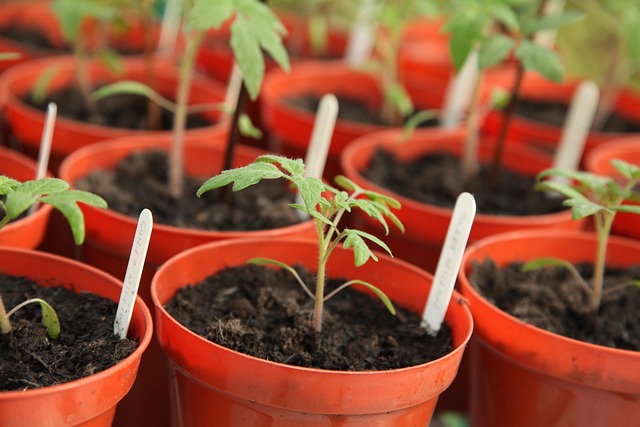
Note the photo above. It shows seedlings that are well developed. They’ve grown well beyond their first set of leaves. This stage is way too late for potting on. You need to pot on the seedlings long before this stage.
Allow the seedlings to establish themselves in the pots for a week or two before hardening them off.
Hardening Off:
Start hardening off the seedlings after the last chance of frost, and after the seedlings have grown past their first set of leaves. Do so with care, making sure that the conditions outdoors are not too harsh. Expose them to the outdoors for a few hours per day, bringing them in for the night. Gradually extend their exposure to a full day over the course of a week, then leave them out overnight.
Hardening off minimizes the shock of exposing the seedlings to the outdoor conditions of wind, bright sun and temperature variation, while gradually acclimating them to the outdoors and to more infrequent watering.
Infrequent watering will allow the soil to dry somewhat in order to encourage root growth, among other benefits. Take care not to let the soil dry out so much that the seedlings begin to wilt.
In the next post we’ll choose the best place to plant our new tomato crop.
Cheers!
Photo Credit – Pixabay, jag2020-6056630 (J Garget)